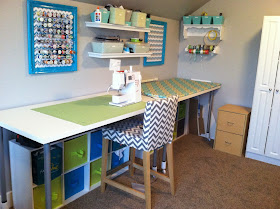
 After several years of being in a cramped bedroom office, shared with the treadmill and no room to spare, I was so excited to have more space of my own so that I didn't have to take over the dinning room table every time I was working on a project.
Since I had been used to limited space, all my supplies were stored away in bins and containers in the closet, and my thread bin was bursting at the seams. With all the threads jumbling around in the box together, the threads became a heap of tangles and I had to hack my way through with scissors every time I needed a different color. I wanted better organization and quicker access with out cluttering up my office.
I searched every where I could think of online and in-store for a nice looking thread rack and came up empty handed. I wanted a statement piece that was also functional, but at the same time I really wasn't interested in investing much time or money in to the project so I made it as simple as possible.
What you need:
Supplies:
- Balloon Sticks
- Foam Core
- Free Template (or Wrapping Paper/Fabric or other decorative covering)
- Picture Frame (Mine came from Hobby Lobby, 50% off $30, so it was a steal at $15 and already painted)
Tools:
- Hot Glue Gun
- Craft Knife
- Craft Spear (piercing tool)
- Mechanical Pencil
- ATG Tape or other adhesive
(I will let you in on a secret, ATG Tape Gun, typically used for Picture Matting and Framing....works amazingly well for so many craft projects, and you don't have all the fumes and mess from spray adhesive.)
 Directions:
1. Cut the foam core to size to fit your frame. The Hobby Lobby frame shown in the picture has a picture size of 16"x20"
(Quick tip, when cutting foam core make sure you have a good
ruler. I prefer my thick plastic quilting ruler. Also it is best to use a new
or sharp blade. Cut the foam core through a series of passes. The first pass is
just to score the top layer of paper. The second pass with be guided by the
track the initial score created. Continue passing over the cut line a total of
3 or 4 times or more if needed to make sure you cut all the way through.)
 2. Cover with paper of your choice. If you use your own paper, use
the blank template below. If you want one of the chevron designed papers there
are multiple colors to choose from.
2. Cover with paper of your choice. If you use your own paper, use
the blank template below. If you want one of the chevron designed papers there
are multiple colors to choose from.2A. If you use the printable chevron simply trim off white perimeter border. The pages tile left to right, top to bottom with Page 1 starting in the upper left corner. When tiled together it will be just short of 16x12 as long as your printers white margins are 1/4" or less.
3. Mark Grid using blank grid template or choose from an
assortment of colors with the free printable patterned template. (The grid is lightly marked on the
patterned templates.)
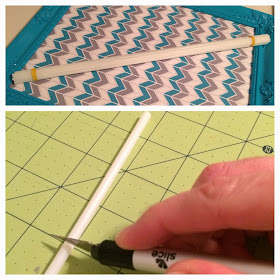
4. If you are using the balloon sticks cut to size, about 3"
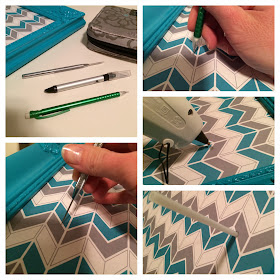
5.Use Craft Spear to punch initial hole, and then use mechanical
pencil tip to widen the hole just enough to fit craft stick inside.
6. Squirt dot of hot glue into hole.
8. Repeat #'s 5-7 till all the craft sticks have been placed
9. Put completed rack into frame and hang.
Template Downloads:
Gray
Turquoise
Yellow
Red
Navy
Pink

Ali, thanks for the instructions. I am working on mine. Susan
ReplyDeleteThis is an amazing idea. Can't wait to make one of my own.
ReplyDeleteGreat segment today! I LOVE thread too! ;)
ReplyDeleteCute idea. This would work well for my bobbins!
ReplyDeleteThis would look great next to my sewing machine.
ReplyDeleteThank you for the great idea, I have got so much thread that this will be amazing when I get it finished. Thank you, thank you!
ReplyDeleteSo cute! You were great on TV.
ReplyDeleteLove this idea! Thanks for sharing your cute home with us!!!
ReplyDeleteWhat a beautiful way to display threads. I never know what gift to give my mother since she has just about everything.Now I know. Will be heading to Hobby Lobby to get all the supplies I need. Thanks for sharing!
ReplyDeleteLOVE LOVE LOVE this idea! I am going to start rounding up the supplies and get this gem made by the weekend! Thanks for the great, ready-to-use idea. You rock!
ReplyDeleteMy jumbled pile of tangled bobbins thanks you!!!
ReplyDeleteCheck back in a few days for more storage solutions for threads including bobbins!
DeleteAli, glad to see that you showed the instructions on Studio 5, still trying to find all the things for mine to finish it. I tried to go to your FB page from the link at the top of your page it is not working, at least I could not get it to work. Thanks for the contest, hoped I entered all of the right places.
ReplyDeleteYou will have to post of picture of your finished holder on Craft Remedy's Facebook page when you are done. Thanks for letting me know about the FB link. It should be working now. Thanks for your feedback!!
DeleteSo cool! I'm excited to make on of these for my craft area. Ali, so are so talented. Thanks for sharing your ideas.
ReplyDeleteHope I did it right! Shared one of your FB links with all of my friends, tagged you in the comments and am commenting here! Seriously I have needed this for my craft room. I just need to go get the supplies! The tape dispenser would just be a bonus :0)
ReplyDeleteThis is such a clever idea. Thanks for sharing it with us!
ReplyDeleteGreat craft! Love the thread rack soo many uses (jewelry, etc.). This craft will bring smiles to many faces! Thanks for sharing.
ReplyDeleteGlad to find you. Fun ideas. Thanks for a fun giveaway.
ReplyDeleteI"ve heard about this ATG gun. It looks amazing and so much better than the options I've been using. I "liked" you on FB.
DeleteI love your idea. My craft room has my treadmill in it. It's a tiny room to begin with. I have my thread on my wall, it's not pretty as yours. You've given my the idea to up my game. I do have my scissors on the wall. I have a red frame around them. It's fun cause I always know right where they are.
ReplyDeleteGreat tutorial on Studio 5. - thanks for the inspiration!
ReplyDeleteI am so excited to have seen this project on Studio 5. What a great organizational project. Thanks
ReplyDeleteThe link is disabled for template download. Will it be available again? How far apart should the sticks be?
ReplyDeleteThanks
Amy